Diabetes Pilot HD for iPad: Instructions
These instructions describe the various features in Diabetes Pilot for iPad. Take a few minutes to look through the following pages to find out about the functions in the program and how to use them.
If you have questions that are not answered here, please visit our support center.
Entering Data
This section explains how to record your data in Diabetes Pilot. Diabetes Pilot can track your glucose, food, medication, exercise, blood pressure, weight and nearly any other type of information that you'd like to record.
Recording and Editing Data on the Details Screen
Creating a new entry
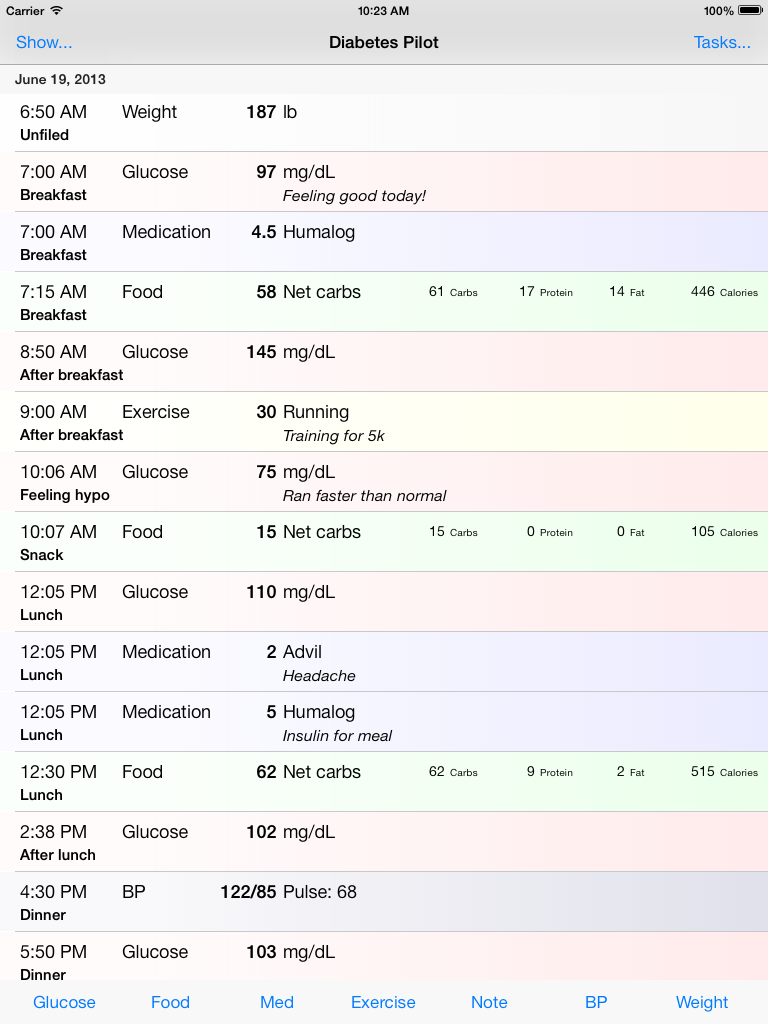
To record a new data item, simply click on one of the buttons at the bottom of the main screen:
- Tap the "Gluc" button to record a new glucose (blood sugar) measurement
- Tap the "Food" button to record a new food or meal
- Tap the "Med" button to enter a medication or insulin dose.
- Tap the "Exer" button to enter a new exercise activity
- Tap the "BP" button to enter a new blood pressure and pulse reading
- Tap the "Weight" button record your weight.
- Tap the "Note" button to record other types of data. The text that you enter for a note entry will be displayed in the list on the main screen. You can use this type of entry to record nearly anything. You might use it to record HbA1C measurements, other test results, notes about how you're feeling, or anything else you'd like.
For more information on entering the details of these items see Recording and Editing Data below.
To edit an existing item, tap on the item in the list.
When you enter a new item change an existing one, it may or may not be immediately visible in the list on the main screen. The display on the main screen depends on the filter settings that you have set - see Displaying Your Data for more information.
Recording and Editing Data in the Details Window

Diabetes Pilot allows you to record information in as much or as little detail as you would like - it provides for both quick data entry as well as the ability to record additional details when needed.
When you create a new record, a detail window will appear. Enter the value for the item:
- For glucose records, enter your blood sugar reading. You can choose to use either mg/dL units (typically used in the United States) or mmol/L units (typically used throughout the world) by setting the desired units in from the preferences menu - see Setting Preferences for more information.
- For medication records, enter the amount of insulin or medication. Select the type of medication by tapping on the box to the right of the value box. If the item you want isn't in the list, tap the "add" button to add a new item to the list. Items that you don't use for an extended period of time will be removed from the list automatically.
- For food records, enter the foods in the meal. See Food Records below for details. Alternately, if you don't want to enter individual foods, you can manually enter the nutrient content of the meal (from your own carb counting, for example) by tapping the "quick" button at the bottom of the screen.
- For exercise records, enter the amount of exercise in whatever units are most useful to you (miles walked, minutes of activity, number of repetitions, etc). Select the type of exercise by tapping on the box to the right of the value box. If the item you want isn't in the list, tap the "add" button to add a new item to the list. Items that you don't use for an extended period of time will be removed from the list automatically.
- For blood pressure records, enter your blood pressure and pulse reading.
- For weight records, enter your weight.
- For note records, just enter the note that you'd like to make.
If you've set Diabetes Pilot to calculate insulin requirements (See Setting Preferences), the insulin calculation will be displayed when entering a glucose or food record. The calculation is updated when you change the value on the data entry screen. Tap the "enter now" button to create a new entry to record the calculated value.
You can enter notes in the space provided. The notes will be displayed in the list on the main screen.
A category for each record can be also be selected. This category can be use to categorize records in any manner that is useful to you. You may want to use the category to identify records by time of day (breakfast, lunch, dinner, etc). The category list can be customized however you would like. To customize the category list, finish entering your record. Then, click on the the "Tasks..." button on the main screen and select "Edit Categories".
Tap "Save" when you are done making your entry. You will return to the main screen. Tapping on "Cancel" returns you to the previous screen without saving your changes.
Tapping on the "Delete" button will delete the displayed record.
Food Records
 Use food records to record meals, snacks, and other foods that you'd like to keep track of. When adding a food record, you can either:
- Quickly enter totals that you already know (from your own carbohydrate estimate, for example) without entering a lot of detail. To do this, tap on the "+" button at the bottom of the screen and enter the nutrition information you'd like to record.
- Or, you can record the details of the meal and have Diabetes Pilot calculate the carbohydrate and other nutrition information for you. The rest of this section explains how to do this.
To build a meal, add foods from the Food Catalog:
Use the "Scan" button to scan a barcode on a packaged food. Diabetes Pilot will look up the food in an online database. If the food is found, it will be added to your meal record. Otherwise, you can enter the food using one of the methods below.
Search or Browse the Food Catalog. Tapping this button takes you to the food database. Find the food that you are looking for by doing any combination of the following:
- Searching the food database by entering a short word or phrase in the search box at the top of the screen. Tap the "Search" button on the on-screen keyboard to perform the search.
- Browsing through the food groups. Food groups are shown on the screen in bold letters. Tap on the group to display its contents.
When you find the food you're looking for, tap on it. It will be added to the Meal Record.
See Using the Food Database for more information about the food database and how to use and personalize it.
Use the "+" button to manually enter an individual food and it's nutrition information.
Use the "Fav" button to access the favorite foods list. Tap on a food in the list to add it to the meal. To use this feature, you'll need to mark some of the foods in the database as favorites. See Using the Food Database for more information.
After adding a food to the meal, adjust the number of servings for the food as necessary by tapping on the food and selecting the number of servings in the selector that appears.
To remove a food from a meal, tap on the food's "i" button, then tap on the trashcan icon on that food's information screen. Or, just swipe the food, then tap the "Delete" button that appears.
To add more foods to the meal, continue to use any combination of the above to add foods as necessary.
The nutrition information for the meal is calculated as you go. The following information is available:
- Carbs: Carbohydrates (grams)
- Calories: Calories
- Prot: Protein (grams)
- Fat: Total Fat (grams)
- Fiber: Total fiber (grams)
- Fat Cal: Calories from fat
- Sat Fat: Saturated fat (grams)
- Cholesterol: Cholesterol (mg)
- Sodium: Sodium (mg)
- Sugars: Sugars (g)
You can also save and recall entire meals. This saves you from having to reenter the individual items for meals that you commonly eat.
To save a meal for future use:
- Tap on the "file folder" icon near the lower right corner of the meal record screen.
- Select "Save this meal" from the menu that appears.
- Enter a name for the meal, then tap the "Save" button.
To recall a previously saved meal:
- Tap on the "file folder" icon near the lower right corner of the meal record screen.
- Select "Add items from saved meal" (to add the saved meal to the existing items) or "Replace with saved meal" (to replace the existing items with the meal items) from the menu.
- Find the meal you want in the list, and tap on it.
To delete a previously saved meal:
- Tap on the "file folder" icon near the lower right corner of the meal record screen.
- Select "Load a saved meal" from the popup menu.
- Select the meal you wish to delete, tap it's "i" button, then tap the trashcan icon on the meal info screen that appears.
Displaying Your Data
This section explains how to control the display of your data in Diabetes Pilot. Diabetes Pilot provides several different filtering options for displaying your data. This allows you to focus on the information that is important to you at a particular moment, without being distracted by other data that you may have recorded.
Display Filters
 To display all of your records on the main screen, tap on the "Show..." button at the top of the screen, then choose "Show all" on the filter selection screen that appears.
To display a filtered selection of your records on the main screen, tap on the "Show..." button at the top of the main screen. This will display a screen where you can choose which records are displayed:
To control which dates are displayed, select an item from the "dates" section of the screen.
To control which record categories are displayed, scroll down and check the boxes next to the categories you wish to display in the area labeled "Categories".
To control which record types are displayed, scroll down and check the boxes next to the record types you wish to display in the area labeled "Record types".
When you're done, tap the "Use Filter" button to return to the main screen. The main screen will then display only the records you've selected.
A record must match all of the filter criteria to be displayed.
Tap the the "Show All" button to allow all of the records to be shown. If you're having trouble finding a record that you think should appear in the list, click this button so that all of the records are displayed - this may help you locate what you're looking for.
Setting Preferences
Diabetes Pilot allows you to set several different options in the program. These options can customize the behavior of Diabetes Pilot to your needs and help save you time while entering data.
General Preferences
 To set general program preferences, tap the "Tasks..." button, then choose "Settings..." from the menu that appears. The general preferences screen allows you to set several options that determine how Diabetes Pilot works:
- Blood glucose ranges. Set your limits for high and low blood sugars and a target range. These values are used with various reports.
- Default Exercise: This allows you to specify the exercise that appears as a default when you are entering a new exercise entry.
- Default Medication: This allows you to specify the medication that appears as a default when you are entering a new medication entry.
- For Meals Show: This specifies which nutrient is displayed on the main record listing screen for meal entries. You can choose from carbohydrates, fiber, protein, fat, calories, saturated fat, sugars, sodium, cholesterol, calories from fat, and net carbs (carbohydrates minus fiber).
- Glucose Units: This item allows you to select between either mg/dL units (typically used in the United States) or mmol/L units (typically used throughout the world) for glucose measurements. Please note that if you change this setting, your existing glucose data and target glucose ranges will be converted to the system of measurement that you select. Please note that converting back and forth between the two systems of measurement may result in small changes to your data that are caused by rounding during the conversion process. For this reason, we recommend that you select the system that you prefer and then leave this setting unchanged.
- Weight Units: Specifies the units that you'd like to use for weight records. Choose pounds (lb) or kilograms (kg)
- Smart Categories: With this option selected, Diabetes Pilot will try to preelect a category for new records based on the patterns in your past entries. This can save time in data entry, and you can always change the category to whatever you'd like. If you turn this off, new records default to the "Unfiled" category.
- Share New Foods: When selected, new foods that you enter into a database will be sent to Diabetes Pilot for possible sharing with other users in the future. Only the nutrition data that you enter for the foods is shared - no personal information or records are transmitted. You can turn this off if you'd prefer to not participate.
- Show Newer Records at Top: Sorts the record list with newer records at the top and older records at the bottom of the record list.
Insulin Calculation Settings
Diabetes Pilot can calculate an estimated insulin dose when you are entering a glucose reading or a meal. These calculations are based solely on parameters that you enter. To use the insulin calculation features, these parameters must be configured for your personal needs, and the feature must be turned on.
The insulin calculation feature is provided as an educational tool that some people may find useful. It is not appropriate for everyone or for all circumstances. THE INSULIN CACLULATION FUNCTION IS A SIMPLE CALCULATION, MUCH LIKE YOU MIGHT PERFORM YOURSELF USING A POCKET CALCULATOR - IT IS NOT INTENDED AS MEDICAL ADVICE AND SHOULD NOT BE USED AS SUCH. If you do not understand this feature, please do not use it. If you do not understand what values to use on the configuration screen, please consult your doctor. In any case, by using Diabetes Pilot, you agree to assume full responsibility for your health care and you agree that Diabetes Pilot and its authors are not liable for any direct or indirect consequences of any results (correct or incorrect) returned by the program.
ALWAYS VERIFY THE CALCULATIONS WITH YOUR PHYSICIAN OR HEALTH PRACTITIONER.
Please note that the insulin calculations presented by the program when you are making glucose and meal entries consider only the current entry. The calculations do not consider any other factors, such as exercise, previous doses, previous food, or other circumstances that could significantly affect the amount of insulin that is required. You must use your own judgement to account for these various factors.
 To configure the insulin calculation feature, tap the "Insulin Calcs..." button at the top of the preferences/settings screen. The configuration screen will be displayed:
- Use 1 U per __ g carbohydrate: If this switch is turned on, an insulin calculation will be displayed on the meal detail record screen when you are making a meal entry. Insulin is calculated by dividing the carbohydrate content of the meal by the value entered. So, for example, if you take 1 unit of insulin for every 15 grams of carbohydrate in a meal, you would enter "15" in the space provided.
- Subtract fiber from carbs: If this switch is turned on, the fiber content of the meal will be subtracted from the overall carbohydrate total when performing the calculation described above.
- Add 1U per __ g Protein: If this switch is turned on, an additional quantity of insulin will be calculated according to the protein content of the meal. Insulin is calculated by dividing the protein content of the meal by the value entered. So, for example, if you take an additional 1 unit of insulin for every 7 grams of protein in a meal, you would enter "7" in the space provided. Note that this is in addition to the carbohydrate calculation described above and is only available when the carbohydrate calculation is used.
- Calculate Insulin Required to Lower Glucose: If this switch is turned on, an insulin calculation will be displayed on the glucose record detail screen when you are making a glucose entry. The insulin estimate is calculated by taking the difference between your target and the glucose entry you are currently making and dividing it by the factor that you have entered. (If the glucose reading you are entering is below your target, no correction is shown).
Editing Categories
Diabetes Pilot allows you to categorize your records however you would like. Many people like to use these categories to group their records by time of day. However, you can change the category names to anything that you'd like.
To edit the category list:
On the main screen, tap the "Tasks..." button, then select "Edit Categories...". Then,
- Use the "+" button to add a new category.
- Use the "-" button next to a category to delete it.
- Drag the categories into the order that you prefer by dragging the bars on the right side of each category listing.
Using the Food Database
This section explains how to use the Diabetes Pilot food database. The food database provides reference information on thousands of foods. You can add your own foods to the database and customize it to meet your needs.
Accessing the Food Database
The food database is available when you're entering a food record. From the main screen, tap the "Food" buton to start a new food record. Then, tap the "DB" button at the bottom of the food record screen to display the database. Or, tap the "Fav" button to access the favorites list.
About the Food Database
The food database contains two types of foods:
- Built-in foods. Diabetes Pilot contains a food database that starts with thousands of basic food items. You can edit, delete, and add to these foods however you'd like. These foods are available at any time, even when you don't have an internet connection.
- Online Foods. In addition to the built-in foods, Diabetes Pilot is linked to online food reference databases. This provides a vast assortment of additional foods, restuaurant items, and packaged items that you can also use as you're recording your meals. These items are available when you have an internet connection. Because they are provided by an external source, you can not edit these items.
Finding Foods
You can locate foods in the food database in several different ways:
Browse through your foods by category.
To browse through the foods by category, tap on the items to navigate through the database. Food groups are indicated by bold text and an ">" arrow indicator at the side of the item. Foods are indicated by regular text.
To open a group and see its contents, tap on the group's name. To edit the name of the group, tap the "edit" button.
To back up and go out of the group, tap the "Back" button near the top of the screen.
To select a food, click on the food's name. This adds the food to the meal record that you're working on. To edit the foods name or nutrition data, or to just view the nutrition data, tap on the "edit" button next to the food.
Search for foods by name.
To search for foods by name, type in the "Search" box near the top of the screen. Enter a few letters of the food you are looking for in the "Search" box, then tap the "Search" button in the on-screen keyboard. The food database will be searched for what you enter. Any food or group containing your search letters will be displayed in the search box. You will usually have better results with the search feature if you enter just a few letters of a food name - this way, the food will appear in the results even if it is named a bit differently than you'd expect. This is a good way to find a food if you can't find it by browsing.
To select a food, click on it in the search result list.
Scan a Barcode
Tap the "Scan" button. Scan the barcode on a packaged food item using the camera in your device. If the food is found, it will be added to your meal record.
Adding New Foods and Groups
To add a new food or group to the food database, browse through the database to locate the place where you'd like to put the new item. Start by browsing to the location where you would like the new item added (see Finding Foods above). Select the group in which you would like to add the new item.
To add a new item, tap the "+" button near the top of the food catalog. Then,
To add a new group, choose "New Group" from the menu that appears, enter a name for the new group, and tap the save button.
To add a new food, choose "New Food" from the menu that appears, fill out the food information screen that appears, and tap the save button.
Marking Foods as Favorites

When a food is marked as a favorite, it will appear in the Favorites List. This allows you to create a short list of foods that you use frequently so that they can be found quickly. The favorites list can be displayed while entering a food record - from the main screen, start a food record by tapping on the "Food" button, then tap the "fav" button near the bottom of the screen.
To mark a food as a favorite:
- Find the food in the database (see Finding Foods above).
- Edit the food (by tapping on its "i" button)
- Switch on the "show in favorites list" switch
To remove a food from the favorites list, do the steps above, but turn off the "show in favorites list" switch.
Note: You can add built-in foods to your favorites list. Online foods cannot be added to the favorites list because they are subject to change from time to time. The favorites switch will not appear for these foods.
Organizing and Customizing the Food Database
Several functions are available to help you organize and customize the food database.
To delete a food from the database:
- Find the food in the database (see Finding Foods above).
- Edit the food (by tapping on its "i" button)
- Tap on the trashcan button near the bottom of the screen.
To edit the name or data associated with a food or group:
- Find the food in the database (see Finding Foods above).
- Edit the food (by tapping on its "i" button)
- Make the changes that you desire to the food or group data.
- Tap the OK button.
Reports: Analyzing, Printing, and Sharing Your Data
The reporting features in Diabetes Pilot allow you to review and analyze your data, send it to your doctor, archive it for safekeeping, and transfer it to other programs.
To access the reporting features, click the "Reports" icon on the toolbar.
Creating Reports
Creating a report in Diabetes Pilot is easy. From the main screen, tap the "Tasks..." button, then choose the report you'd like from the menu.
Select the report you would like to create from the list near the upper left corner of the Diabetes Pilot window. There are several reports to choose from:
- Recent Glucose Averages - Shows your average glucose for various time periods and your current estimated A1C.
- Logbook by Category - Shows your records in a "logbook" grid format organized by category
- Logbook by Time - Shows your records in a logbook format in a flexible grid organized by time
- Record Listing - Lists your records in a manner similar to how they appear on the My Records page.
- Record Graph - Graphs your individual glucose readings, food, and medication over time
- Average BG by Category - Shows your average glucose organized by category
- Average BG by Hour - Shows your average glucose as an average for each hour of the day
- Average BG by Month - Shows your average glucose by month
- Glucose Ranges - Shows the number of glucose measurements in your target range, above your "high" limit, and below your "low" limit. These ranges can be set in the preferences window (seeSetting Preferences for more information)
- Glucose Ranges by Category - Shows the number of glucose measurements in your target range, above your "high" limit, and below your "low" limit for each individual category.
- Daily Food Totals - Summarizes food intake by day
- Meal Listing - Provides a detailed list of your meal records
- Medication Totals by Day - Shows a total of the medications you've entered for each day
- Exercise Totals by Day - Shows a total of the exercises you've entered for each day
- Blood Pressure Graph - Graphs your blood pressure readings
- Weight Graph - Graphs your weight over time
You can customize what records are included in each report.
Choose the records that you would like in the report tapping the "Report Settings" button.
Note that if your filters do not allow any records to be selected, the report will be blank - if this happens, change the filter settings to select the dates, categories, and record types that you want to include.
Also, note that some filter settings may not apply to certain types of reports and will be ignored. For example, the "Recent Glucose Averages" report will always show your recent averages (and ignore the date filter) and the "Medication Totals" report will always show medication records (ignoring the record type filter).
The filter controls provide for numerous report possibilities. For example, if you want a listing of your blood pressure readings, create a "Record Listing" report and select only the "BP" record type.
Using Your Reports
In addition to viewing your reports on-screen in Diabetes Pilot, there are various ways to use your reports outside of the program. First, create a report. Then:
Printing a Report
- Choose "Print" from the bottom toolbar to print the report to an AirPrint-enabled printer.
Saving and Emailing a Report as a PDF
This allows you to email your report to your doctor or whomever you choose. The report is send as a PDF, which allows the recipient to read it without needing Diabetes Pilot themselves.
Choose "Email" from the bottom toolbar.

Syncing your Data
Use Diabetes Pilot on your iPhone, Mac, or PC and sync your data between devices.
The Diabetes Pilot iPhone and Desktop apps are separate products and sold separately from Diabetes Pilot for iPad. They are available through the iTunes App Store.
Transferring your data to another location also provides a backup for your data. Because your handheld may be damaged, lost, or experience problems such as the battery running down, we recommend that you back up your data periodically using any of the options below.
Synchronize Your Data Via WiFi
To use the WiFi sync, you will need your iPad and your iPhone, Mac, or PC connected to the same network.
To start:
- Make sure that both devices are connected to your network. We recommend using a private, secure, network that you control (i.e. a properly configured home network rather than a public WiFi hotspot)
- Make sure that your handheld is connected (via WiFi) to the same network as your computer. (The sync will not work if your device is connected only with a cellular (3G) data connection). If necessary, use the "Settings" app to verify your WiFi settings - check that you're connected to the correct network. You may also wish to use an application such as the Safari web browser (surf to a new page or two) to confirm that you have an active, working, network connection.
To sync with Diabetes Pilot on an iPhone or another iPad: Start on that device: Launch Diabetes Pilot there. Tap the "Tasks..." button, then choose "Data Transfer" then "Desktop Sync via WiFi" or "WiFi Sync" on that device.
Then, start the sync on your iPad: On the main screen, choose "Tasks..." then select "WiFi Sync" from the menu. Select the desired sync options and tap the "Sync" button to start the sync.
To sync with a Mac or PC: On your iPad, launch Diabetes Pilot and taps "Tasks..." then select "WiFi Sync" from the menu. Then, select the sync options and start the sync on your computer. For more information see http://www.diabetespilot.com/desktop/docs/iphone (PC) or http://www.diabetespilot.com/mac/docs/iphone (Mac)

One-way Data Transfer Via Email
The WiFi sync described above is generally the best choice for transferring your data. However, you can also transfer your records from your handheld via email to a computer with Diabetes Pilot Desktop. This can be useful for a variety of purposes: sending your data to a doctor's office that has Diabetes Pilot Desktop, a child sending data to a parent, sending data to yourself for later analysis, transferring your data when the WiFi connection described above isn't practical, and many other situations.
To send the data file by email: Launch Diabetes Pilot on your iPad. Tap the "Tasks..." button, then choose "Email Data File" from the menu.